> For the complete documentation index, see [llms.txt](https://docs.dashcomb.com/dashcomb-help-center/llms.txt). Markdown versions of documentation pages are available by appending `.md` to page URLs; this page is available as [Markdown](https://docs.dashcomb.com/dashcomb-help-center/tips-and-tricks/view-transition.md).
# 画面遷移の実現方法
Dashcombが提供している[メニュー](/dashcomb-help-center/ide/region/menu-region.md)、[View](/dashcomb-help-center/ide/view-section-component.md#view-view)、[UI Componet](/dashcomb-help-center/ide/ui-component.md)を使って、パラメータ付きの画面遷移を簡単に実現できます。もちろん、パラメータなしの画面遷移はパラメータを設定しなければ、もっと簡単に実現できます。
## 準備
* これから使う画面を二つ用意します。一つは遷移元の画面、もう一つは遷移先の画面です。
* 画面の作成は[View](/dashcomb-help-center/ide/view-section-component.md#view-view)にご参照ください。
## 実現
* 遷移先画面の[プロパティ領域](/dashcomb-help-center/ide/property-region.md)を開きます。
* 「パラメータ」の横にある「+」アイコンを押します。
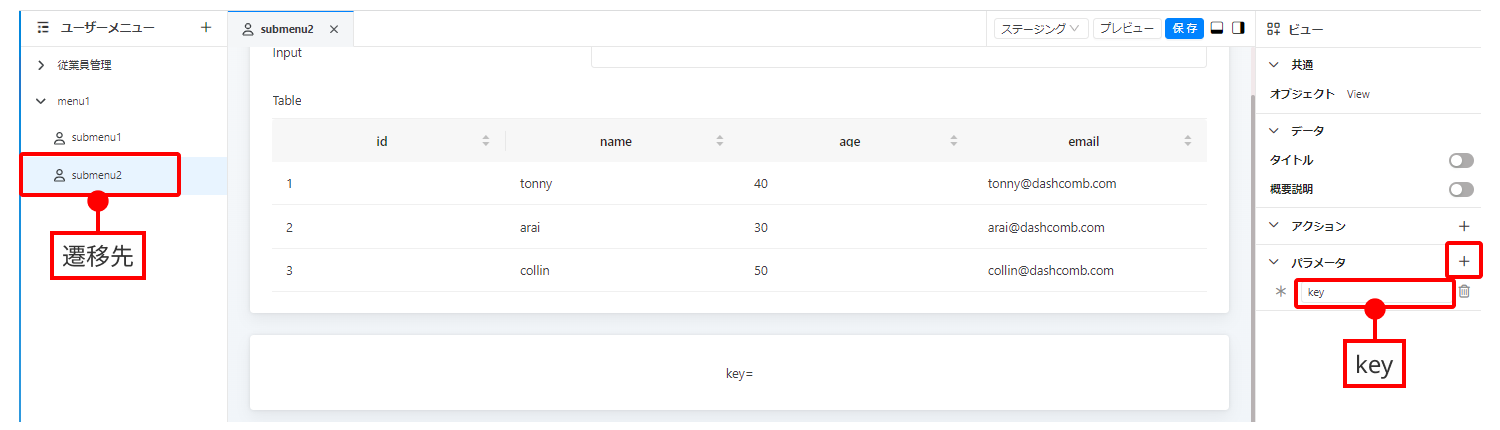 * パラメータ名の初期値 `keyName0` を `key` に変更します。
* 必要に応じて、「\*」アイコンを押し、必須項目に指定することも可能です。
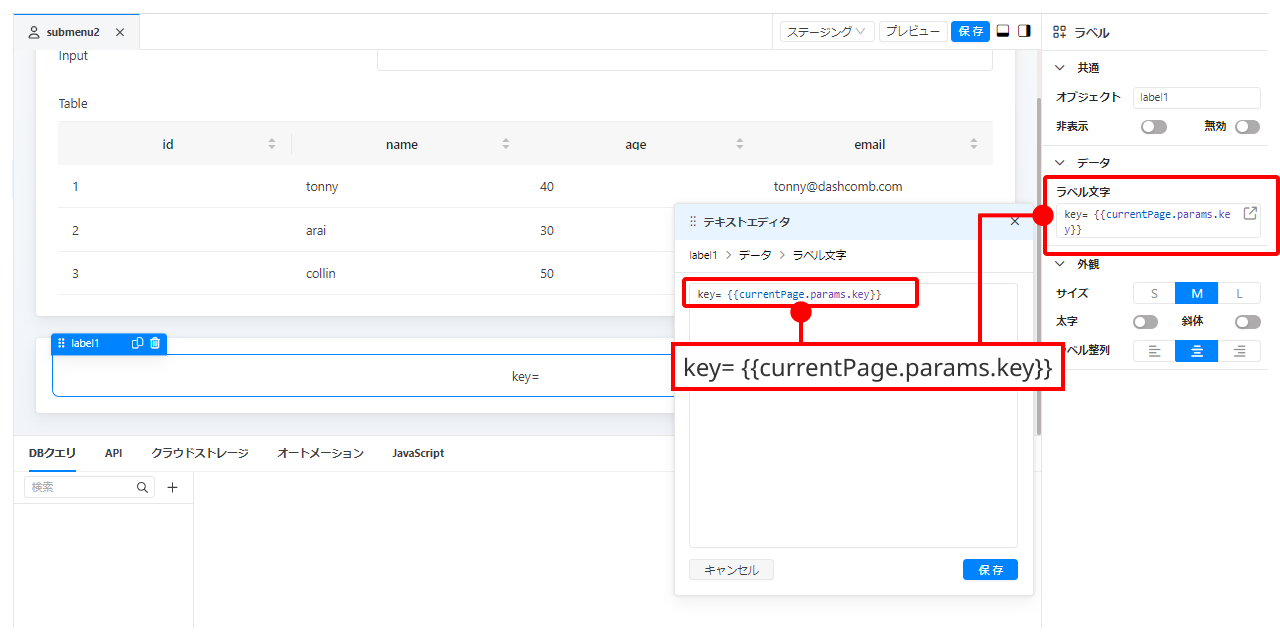
* [Label](/dashcomb-help-center/ide/ui-component/label.md)コンポーネントをドラッグ&ドロップして、パラメータ確認用ラベルを作成します。
* その[プロパティ領域](/dashcomb-help-center/ide/property-region.md)にある「ラベル文字」の初期値 `label` を `key= {{currentPage.params.key}}`に変更します。
* パラメータ名の初期値 `keyName0` を `key` に変更します。
* 必要に応じて、「\*」アイコンを押し、必須項目に指定することも可能です。
* [Label](/dashcomb-help-center/ide/ui-component/label.md)コンポーネントをドラッグ&ドロップして、パラメータ確認用ラベルを作成します。
* その[プロパティ領域](/dashcomb-help-center/ide/property-region.md)にある「ラベル文字」の初期値 `label` を `key= {{currentPage.params.key}}`に変更します。
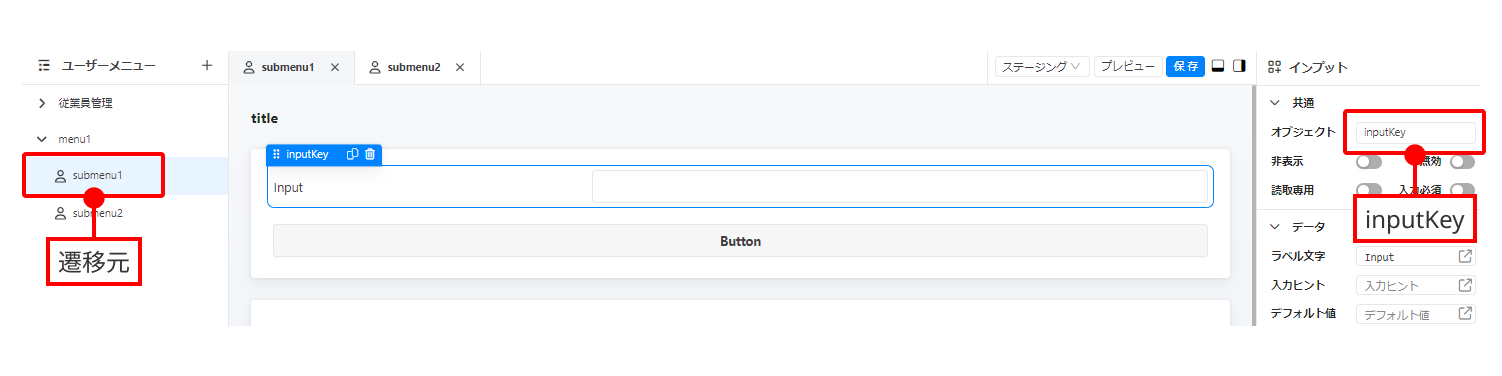
 * 遷移元画面のサブメニューを押して、遷移元画面を開きます。
* [Input](/dashcomb-help-center/ide/ui-component/input.md)コンポーネントをドラッグ&ドロップして、入力ボックスを作成します。
* [Input](/dashcomb-help-center/ide/ui-component/input.md)のオブジェクト名 `input1` を `inputKey` に変更します。
* 遷移元画面のサブメニューを押して、遷移元画面を開きます。
* [Input](/dashcomb-help-center/ide/ui-component/input.md)コンポーネントをドラッグ&ドロップして、入力ボックスを作成します。
* [Input](/dashcomb-help-center/ide/ui-component/input.md)のオブジェクト名 `input1` を `inputKey` に変更します。
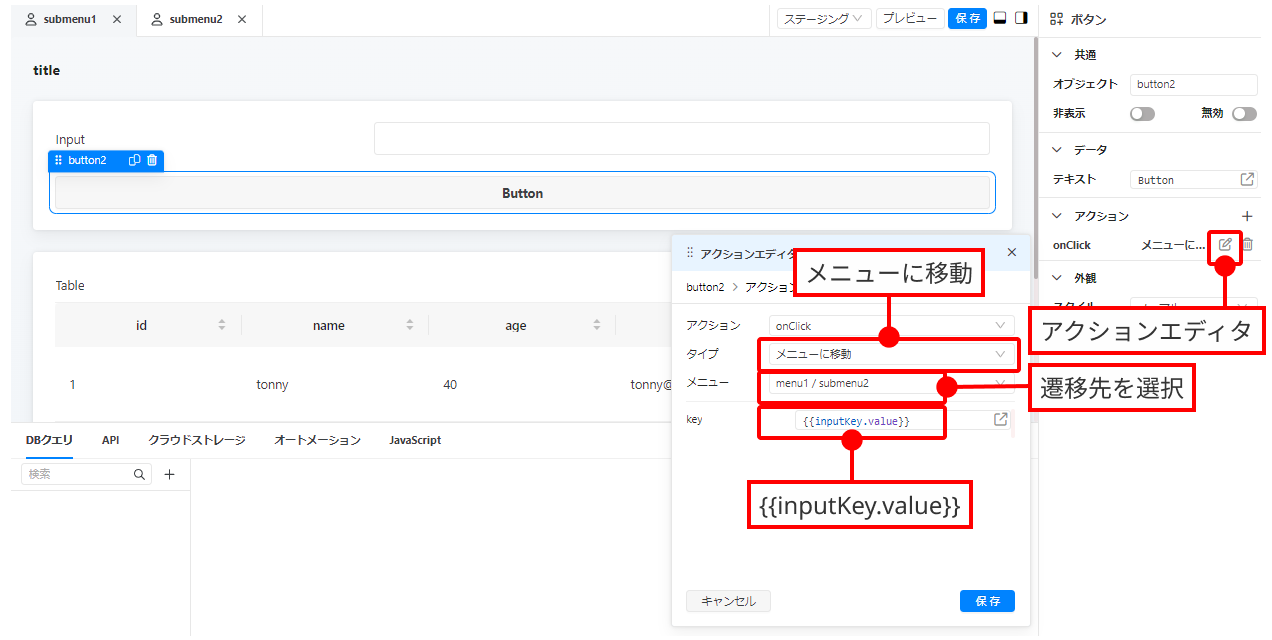
 * [Button](/dashcomb-help-center/ide/ui-component/ui-component-button.md)コンポーネントをドラッグ&ドロップして、遷移用のボタンを作成します。
* そのボタンを押して、ボタンの[プロパティ領域](/dashcomb-help-center/ide/property-region.md)を呼び出します。
* 「onClick」横のアイコンをクリックして、[アクションエディタ](/dashcomb-help-center/ide/property-region/action-editor.md)を呼び出します。
* 「アクション無し」を「メニューに移動」に変更します。
* 「メニュー」を押して、リストから遷移先のメニュー(画面)を選びます。
* 「パラメータ」の `key` 入力ボックスに `{{inputKey.value}}` を入力します。
* [Button](/dashcomb-help-center/ide/ui-component/ui-component-button.md)コンポーネントをドラッグ&ドロップして、遷移用のボタンを作成します。
* そのボタンを押して、ボタンの[プロパティ領域](/dashcomb-help-center/ide/property-region.md)を呼び出します。
* 「onClick」横のアイコンをクリックして、[アクションエディタ](/dashcomb-help-center/ide/property-region/action-editor.md)を呼び出します。
* 「アクション無し」を「メニューに移動」に変更します。
* 「メニュー」を押して、リストから遷移先のメニュー(画面)を選びます。
* 「パラメータ」の `key` 入力ボックスに `{{inputKey.value}}` を入力します。
 * 「保存」ボタンを押すと、画面遷移機能の実現ができました。
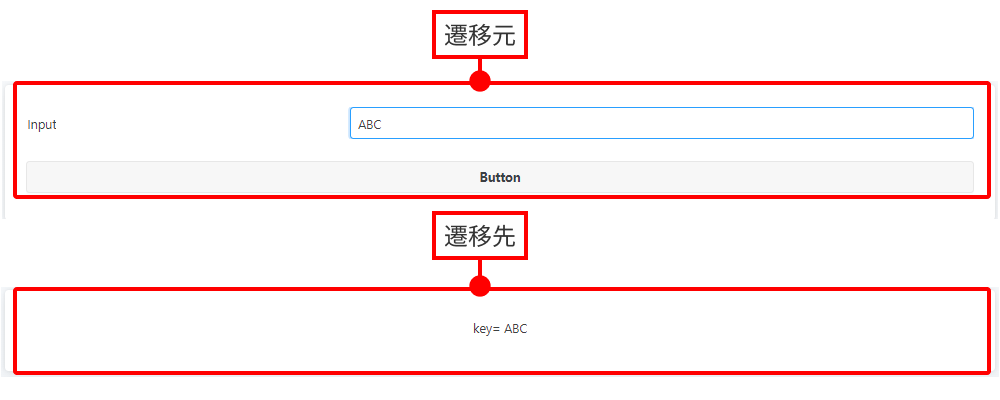
* 確認するには、遷移元画面の[Input](/dashcomb-help-center/ide/ui-component/input.md)に `hoge` を入力して、[Button](/dashcomb-help-center/ide/ui-component/ui-component-button.md)を押すと、遷移先画面に飛んで、確認用ラベル `key= hoge` を確認できます。
* 「保存」ボタンを押すと、画面遷移機能の実現ができました。
* 確認するには、遷移元画面の[Input](/dashcomb-help-center/ide/ui-component/input.md)に `hoge` を入力して、[Button](/dashcomb-help-center/ide/ui-component/ui-component-button.md)を押すと、遷移先画面に飛んで、確認用ラベル `key= hoge` を確認できます。
 ## 参照項目
* [プロパティ領域](/dashcomb-help-center/ide/property-region.md)
* [Inputの使い方](/dashcomb-help-center/ide/ui-component/input.md)
* [Buttonの使い方](/dashcomb-help-center/ide/ui-component/ui-component-button.md)
* [アクションエディタ](/dashcomb-help-center/ide/property-region/action-editor.md)
## 参照項目
* [プロパティ領域](/dashcomb-help-center/ide/property-region.md)
* [Inputの使い方](/dashcomb-help-center/ide/ui-component/input.md)
* [Buttonの使い方](/dashcomb-help-center/ide/ui-component/ui-component-button.md)
* [アクションエディタ](/dashcomb-help-center/ide/property-region/action-editor.md)