> For the complete documentation index, see [llms.txt](https://docs.dashcomb.com/dashcomb-help-center/llms.txt). Markdown versions of documentation pages are available by appending `.md` to page URLs; this page is available as [Markdown](https://docs.dashcomb.com/dashcomb-help-center/tips-and-tricks/add-approval-flow.md).
# 承認フローを作成
Dashcombは既に作成された[DBクエリ](/dashcomb-help-center/ide/others/dtassu/database.md)、[API](/dashcomb-help-center/ide/others/dtassu/api.md)や[クラウドストレージ](/dashcomb-help-center/ide/others/dtassu/cloud-storage.md)にさらに承認フローを作成することができます。承認フローとは、事前に承認者を指定することで、アクションを行う前に承認者の承認を得る仕組みです。
承認フローの組み込まれたアクションは、まず画面上の変更箇所などの情報を承認者に転送し、承認者の承認を得た時点で、アクションが実行される一方、承認者の拒否を得た時点で、再度提出もできます。
## 準備
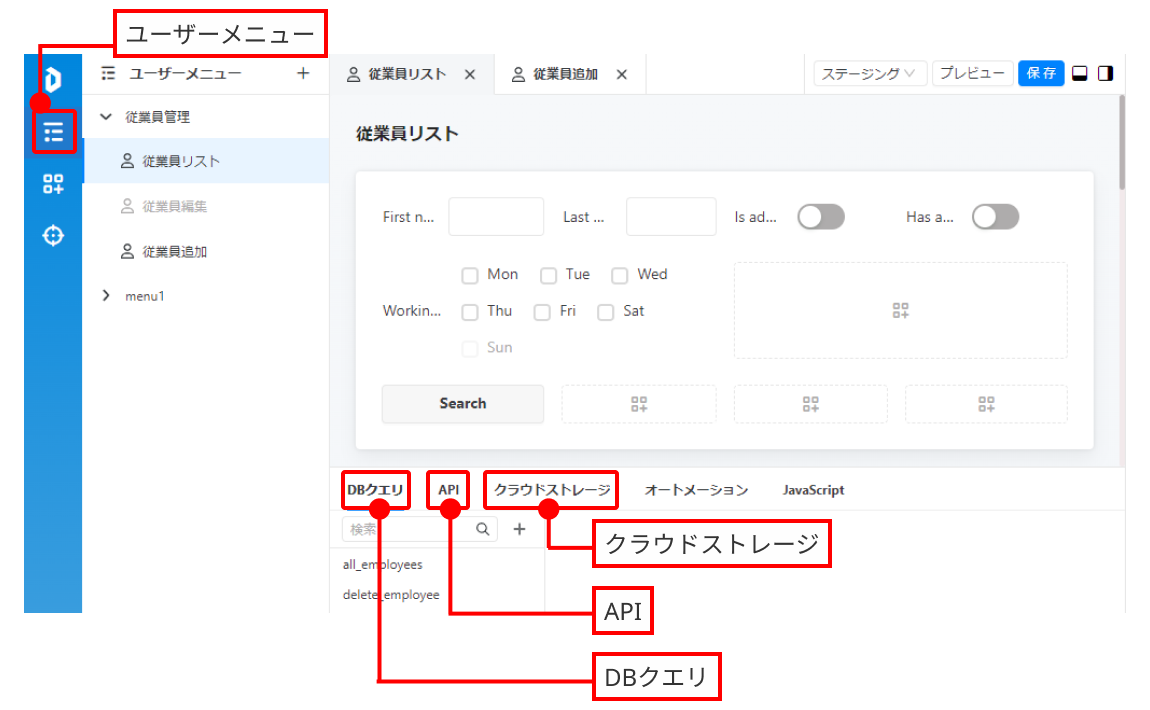
* 承認フローが必要となる[DBクエリ](/dashcomb-help-center/ide/others/dtassu/database.md)、[API](/dashcomb-help-center/ide/others/dtassu/api.md)や[クラウドストレージ](/dashcomb-help-center/ide/others/dtassu/cloud-storage.md)のいずれかを用意します。
 ## 実現
* 承認が必要となる既存の「DBクエリ」、「API」、「クラウドストレージ」のいずれかをクリックします。
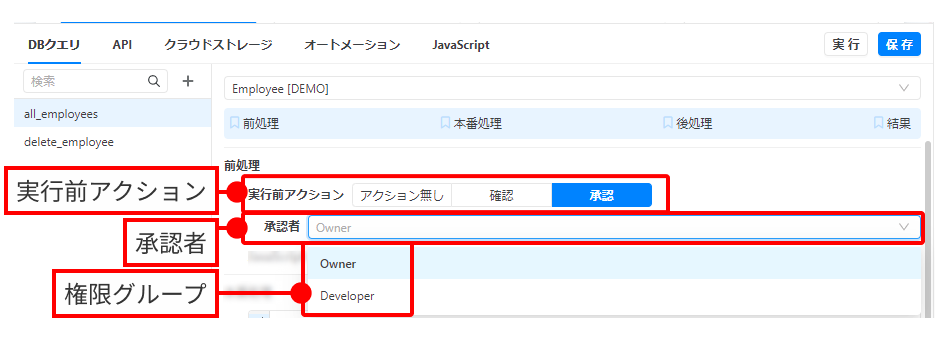
* 「実行前アクション」に「承認」を選びます。
* 「承認者」リストから、承認権限を与える権限グループを指定します。
* 「成功時」、「失敗時」の「通知」を設定します。
* 設定方法の詳細は[アクションエディタ](/dashcomb-help-center/ide/property-region/action-editor.md)にご参考ください。
* 「保存」ボタンを押すと、承認フローの作成ができました。
* 実行前処理に承認フローが設定されたクエリが呼び出される際、まず承認処理が行われるようになります。承認された後、当該クエリの処理が実行されます。
## 実現
* 承認が必要となる既存の「DBクエリ」、「API」、「クラウドストレージ」のいずれかをクリックします。
* 「実行前アクション」に「承認」を選びます。
* 「承認者」リストから、承認権限を与える権限グループを指定します。
* 「成功時」、「失敗時」の「通知」を設定します。
* 設定方法の詳細は[アクションエディタ](/dashcomb-help-center/ide/property-region/action-editor.md)にご参考ください。
* 「保存」ボタンを押すと、承認フローの作成ができました。
* 実行前処理に承認フローが設定されたクエリが呼び出される際、まず承認処理が行われるようになります。承認された後、当該クエリの処理が実行されます。
 ## 参照項目
* [承認ワークフローで、データの制作性と責任の所在を確保する](/dashcomb-help-center/tips-and-tricks/wkufurdedtanotonowosuru.md)
* [アクションエディタ](/dashcomb-help-center/ide/property-region/action-editor.md)
* [DBクエリの追加](/dashcomb-help-center/tips-and-tricks/add-a-database-query.md)
* [API経由のCRUD操作](/dashcomb-help-center/tips-and-tricks/api-crud.md)
## 参照項目
* [承認ワークフローで、データの制作性と責任の所在を確保する](/dashcomb-help-center/tips-and-tricks/wkufurdedtanotonowosuru.md)
* [アクションエディタ](/dashcomb-help-center/ide/property-region/action-editor.md)
* [DBクエリの追加](/dashcomb-help-center/tips-and-tricks/add-a-database-query.md)
* [API経由のCRUD操作](/dashcomb-help-center/tips-and-tricks/api-crud.md)