> For the complete documentation index, see [llms.txt](https://docs.dashcomb.com/dashcomb-help-center/llms.txt). Markdown versions of documentation pages are available by appending `.md` to page URLs; this page is available as [Markdown](https://docs.dashcomb.com/dashcomb-help-center/tips-and-tricks/database-crud.md).
# データベース経由のCRUD操作の実現方法
Dashcombではデータベース経由のCRUD操作が簡単に実現できます。CRUD操作とはデータを操作する際の種別で、Create(作成)、Read(参照)、Update(更新)、及びDelete(削除)です。IDE画面のコンポーネントをドラッグ&ドロップして、DBデータの収集や表示、アクションの指定、通知の表示などが実現できます。
## 準備
* DBレコードの作成用、参照用、更新用、及び削除用のDBクエリを作っておきます。
* 作成方法や注意事項は[DBクエリの追加](/dashcomb-help-center/tips-and-tricks/add-a-database-query.md)を参照してください。
## 実現
* CRUD操作は新規作成、参照表示(N件、1件)、参照&更新、削除機能を分けて、画面ベースの実現方法をご紹介します。
***
 * Create(新規作成機能)
* Dashcombの[View](/dashcomb-help-center/ide/layout-component.md)や[Section](/dashcomb-help-center/ide/layout-component.md)をドラッグ&ドロップし、新規作成用の画面を作成します。
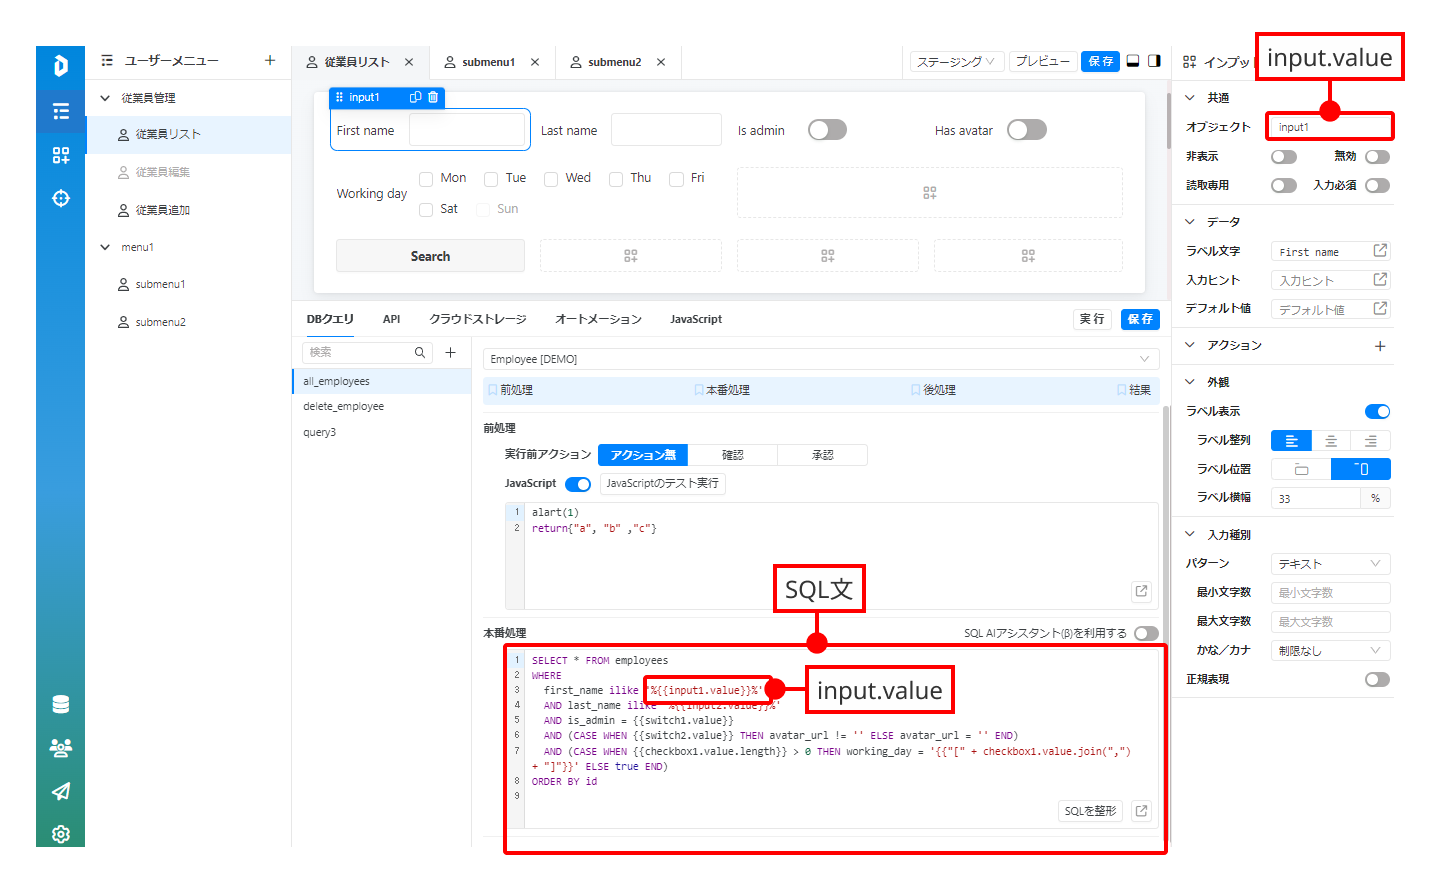
* Dashcombの[Input](/dashcomb-help-center/ide/ui-component/input.md)などをドラッグ&ドロップし、入力ボックスを作成します。
* 引数 `{{input.value}}` をSQL文に埋め込みます。
* Dashcombの[Select](/dashcomb-help-center/ide/ui-component/select.md)などをドラッグ&ドロップし、選択ボックスを作成します。
* 引数 `{{select.value}}` をSQL文に埋め込みます。
* Dashcombの[Button](/dashcomb-help-center/ide/ui-component/ui-component-button.md)をドラッグ&ドロップし、新規登録用ボタンを作成します。
* [Button](/dashcomb-help-center/ide/ui-component/ui-component-button.md)アクションの「タイプ」に「クエリ実行」を選びます。
* 「クエリ」に作成系のDBクエリを指定します。(バリデーションなどを加えるのも可能)
* 詳細は[アクションエディタ](/dashcomb-help-center/ide/property-region/action-editor.md)にご参照ください。
* 「保存」ボタンを押すと、シンプルな新規作成機能の画面が出来上がります。
***
* Read(参照表示機能 N件)
* Dashcombの[View](/dashcomb-help-center/ide/layout-component.md)や[Section](/dashcomb-help-center/ide/layout-component.md)をドラッグ&ドロップし、参照表示用の画面を作成します。
* Dashcombの[Input](/dashcomb-help-center/ide/ui-component/input.md)などをドラッグ&ドロップし、検索用入力ボックスを作成します。
* 引数 `{{input.value}}` をSQL文に埋め込みます。
* Dashcombの[Table](/dashcomb-help-center/ide/ui-component/table.md)などをドラッグ&ドロップし、表示リストを作成します。
* 検索結果 `{{query.data}}` を[Table](/dashcomb-help-center/ide/ui-component/table.md)の「ソースデータ」に埋め込みます。
* Dashcombの[Button](/dashcomb-help-center/ide/ui-component/ui-component-button.md)をドラッグ&ドロップし、検索用ボタンを作成します。
* [Button](/dashcomb-help-center/ide/ui-component/ui-component-button.md)アクションの「タイプ」に「クエリ実行」を選びます。
* 「クエリ」に表示系のDBクエリを指定します。(バリデーションなどを加えるのも可能)
* 詳細は[アクションエディタ](/dashcomb-help-center/ide/property-region/action-editor.md)にご参照ください。
* 「保存」ボタンを押すと、複数データの参照表示機能の画面が出来上がります。
* Read(参照表示機能 1件)
* Read(参照表示機能 N件)で作成された[Table](/dashcomb-help-center/ide/ui-component/table.md)のアクションに詳細表示用のボタンを追加して、アクション「タイプ」に「クエリ実行」を選びます。
* 「クエリ」に一意制約の表示系DBクエリを指定します。
* 詳細は[アクションエディタ](/dashcomb-help-center/ide/property-region/action-editor.md)にご参照ください。
* 「保存」ボタンを押すと、ユニークデータの参照表示機能の画面が出来上がります。
***
***
* Update(参照&更新機能)
* Dashcombの[View](/dashcomb-help-center/ide/layout-component.md)や[Section](/dashcomb-help-center/ide/layout-component.md)をドラッグ&ドロップし、参照&更新用の詳細画面を作成します。
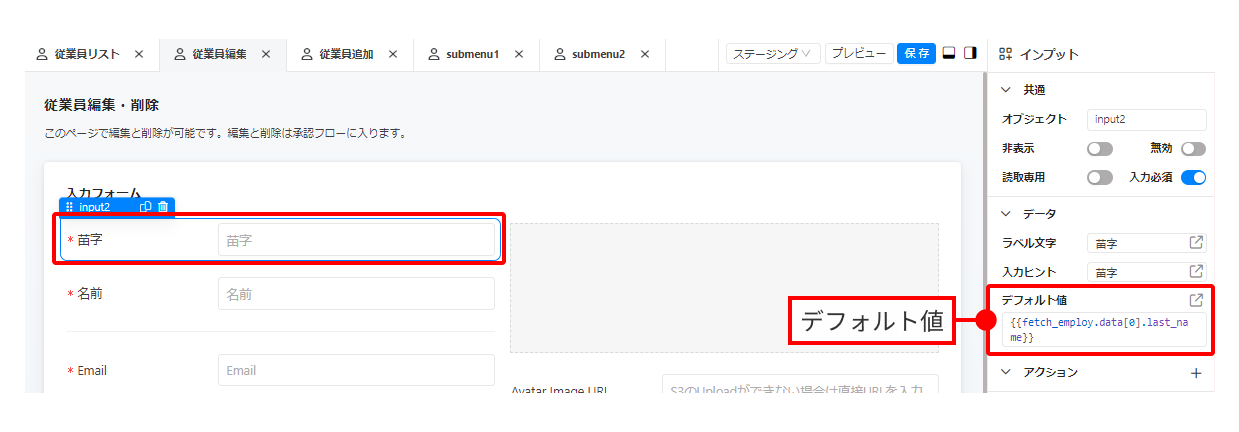
* Dashcombの[Input](/dashcomb-help-center/ide/ui-component/input.md)などをドラッグ&ドロップし、入力ボックスを作成します。
* 一意検索の結果 `{{query.data.コラム名}}` をデフォルト値に入力します。
***
* Create(新規作成機能)
* Dashcombの[View](/dashcomb-help-center/ide/layout-component.md)や[Section](/dashcomb-help-center/ide/layout-component.md)をドラッグ&ドロップし、新規作成用の画面を作成します。
* Dashcombの[Input](/dashcomb-help-center/ide/ui-component/input.md)などをドラッグ&ドロップし、入力ボックスを作成します。
* 引数 `{{input.value}}` をSQL文に埋め込みます。
* Dashcombの[Select](/dashcomb-help-center/ide/ui-component/select.md)などをドラッグ&ドロップし、選択ボックスを作成します。
* 引数 `{{select.value}}` をSQL文に埋め込みます。
* Dashcombの[Button](/dashcomb-help-center/ide/ui-component/ui-component-button.md)をドラッグ&ドロップし、新規登録用ボタンを作成します。
* [Button](/dashcomb-help-center/ide/ui-component/ui-component-button.md)アクションの「タイプ」に「クエリ実行」を選びます。
* 「クエリ」に作成系のDBクエリを指定します。(バリデーションなどを加えるのも可能)
* 詳細は[アクションエディタ](/dashcomb-help-center/ide/property-region/action-editor.md)にご参照ください。
* 「保存」ボタンを押すと、シンプルな新規作成機能の画面が出来上がります。
***
* Read(参照表示機能 N件)
* Dashcombの[View](/dashcomb-help-center/ide/layout-component.md)や[Section](/dashcomb-help-center/ide/layout-component.md)をドラッグ&ドロップし、参照表示用の画面を作成します。
* Dashcombの[Input](/dashcomb-help-center/ide/ui-component/input.md)などをドラッグ&ドロップし、検索用入力ボックスを作成します。
* 引数 `{{input.value}}` をSQL文に埋め込みます。
* Dashcombの[Table](/dashcomb-help-center/ide/ui-component/table.md)などをドラッグ&ドロップし、表示リストを作成します。
* 検索結果 `{{query.data}}` を[Table](/dashcomb-help-center/ide/ui-component/table.md)の「ソースデータ」に埋め込みます。
* Dashcombの[Button](/dashcomb-help-center/ide/ui-component/ui-component-button.md)をドラッグ&ドロップし、検索用ボタンを作成します。
* [Button](/dashcomb-help-center/ide/ui-component/ui-component-button.md)アクションの「タイプ」に「クエリ実行」を選びます。
* 「クエリ」に表示系のDBクエリを指定します。(バリデーションなどを加えるのも可能)
* 詳細は[アクションエディタ](/dashcomb-help-center/ide/property-region/action-editor.md)にご参照ください。
* 「保存」ボタンを押すと、複数データの参照表示機能の画面が出来上がります。
* Read(参照表示機能 1件)
* Read(参照表示機能 N件)で作成された[Table](/dashcomb-help-center/ide/ui-component/table.md)のアクションに詳細表示用のボタンを追加して、アクション「タイプ」に「クエリ実行」を選びます。
* 「クエリ」に一意制約の表示系DBクエリを指定します。
* 詳細は[アクションエディタ](/dashcomb-help-center/ide/property-region/action-editor.md)にご参照ください。
* 「保存」ボタンを押すと、ユニークデータの参照表示機能の画面が出来上がります。
***
***
* Update(参照&更新機能)
* Dashcombの[View](/dashcomb-help-center/ide/layout-component.md)や[Section](/dashcomb-help-center/ide/layout-component.md)をドラッグ&ドロップし、参照&更新用の詳細画面を作成します。
* Dashcombの[Input](/dashcomb-help-center/ide/ui-component/input.md)などをドラッグ&ドロップし、入力ボックスを作成します。
* 一意検索の結果 `{{query.data.コラム名}}` をデフォルト値に入力します。
***
 * Read(参照表示機能 1件)で作成された詳細表示用のボタンをクリックし、一意検索用のキーを取得して、この詳細画面に渡します。
* 詳細は[画面遷移の実現方法](/dashcomb-help-center/tips-and-tricks/view-transition.md)にご参照ください。
* Dashcombの[Button](/dashcomb-help-center/ide/ui-component/ui-component-button.md)をドラッグ&ドロップし、更新用ボタンを作成します。
* [Button](/dashcomb-help-center/ide/ui-component/ui-component-button.md)アクションの「タイプ」に「クエリ実行」を選びます。
* Read(参照表示機能 1件)で作成された詳細表示用のボタンをクリックし、一意検索用のキーを取得して、この詳細画面に渡します。
* 詳細は[画面遷移の実現方法](/dashcomb-help-center/tips-and-tricks/view-transition.md)にご参照ください。
* Dashcombの[Button](/dashcomb-help-center/ide/ui-component/ui-component-button.md)をドラッグ&ドロップし、更新用ボタンを作成します。
* [Button](/dashcomb-help-center/ide/ui-component/ui-component-button.md)アクションの「タイプ」に「クエリ実行」を選びます。
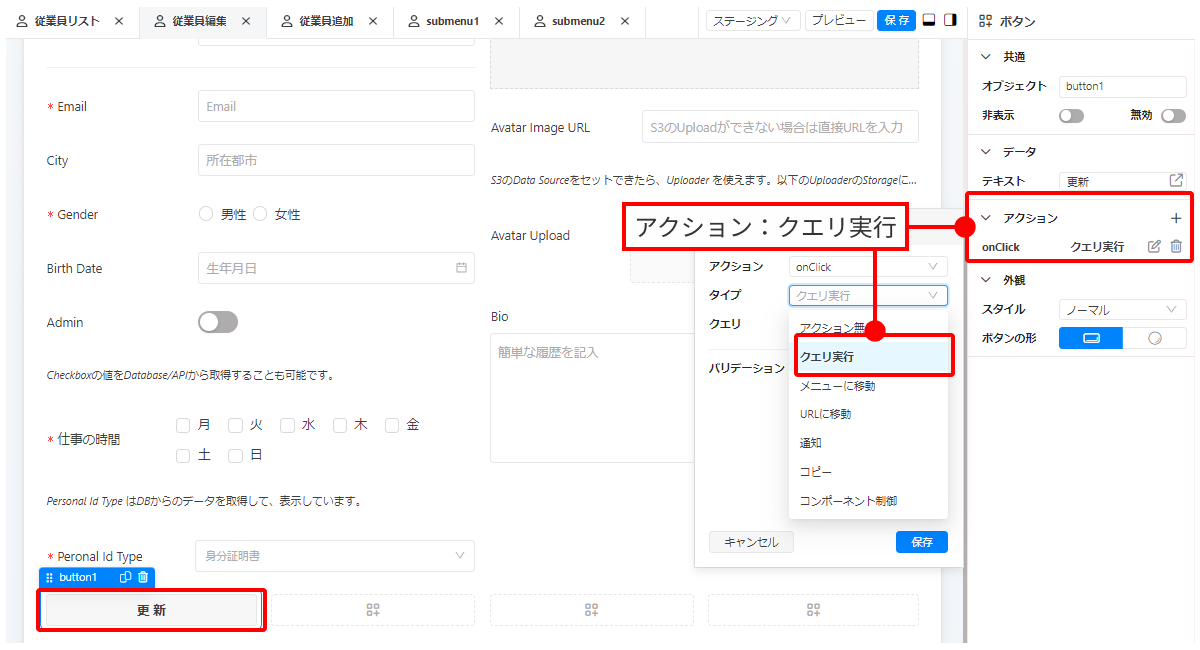 * 「クエリ」に更新系のDBクエリを指定します。(バリデーションなどを加えるのも可能)
* 詳細は[アクションエディタ](/dashcomb-help-center/ide/property-region/action-editor.md)にご参照ください。
* 「保存」ボタンを押すと、シンプルな参照更新機能の画面が出来上がります。
***
* Delete(削除機能)
* Read(参照表示機能 N件)で作成された[Table](/dashcomb-help-center/ide/ui-component/table.md)のアクションに削除用のボタンを追加して、アクション「タイプ」に「クエリ実行」を選びます。
* 「クエリ」に一意制約の削除系DBクエリを指定します。
* 詳細は[アクションエディタ](/dashcomb-help-center/ide/property-region/action-editor.md)にご参照ください。
* 「保存」ボタンを押すと、ユニークデータの削除機能の画面が出来上がります。
## 参照項目
* [Tableの使い方](/dashcomb-help-center/ide/ui-component/table.md)
* [アクションエディタ](/dashcomb-help-center/ide/property-region/action-editor.md)
* [コラムエディタ](/dashcomb-help-center/ide/property-region/column-editor.md)
* [ViewやSection](/dashcomb-help-center/ide/layout-component.md)
* 「クエリ」に更新系のDBクエリを指定します。(バリデーションなどを加えるのも可能)
* 詳細は[アクションエディタ](/dashcomb-help-center/ide/property-region/action-editor.md)にご参照ください。
* 「保存」ボタンを押すと、シンプルな参照更新機能の画面が出来上がります。
***
* Delete(削除機能)
* Read(参照表示機能 N件)で作成された[Table](/dashcomb-help-center/ide/ui-component/table.md)のアクションに削除用のボタンを追加して、アクション「タイプ」に「クエリ実行」を選びます。
* 「クエリ」に一意制約の削除系DBクエリを指定します。
* 詳細は[アクションエディタ](/dashcomb-help-center/ide/property-region/action-editor.md)にご参照ください。
* 「保存」ボタンを押すと、ユニークデータの削除機能の画面が出来上がります。
## 参照項目
* [Tableの使い方](/dashcomb-help-center/ide/ui-component/table.md)
* [アクションエディタ](/dashcomb-help-center/ide/property-region/action-editor.md)
* [コラムエディタ](/dashcomb-help-center/ide/property-region/column-editor.md)
* [ViewやSection](/dashcomb-help-center/ide/layout-component.md)